Getting Started with the i.MX RT1160 Evaluation Kit
本文档内容
-
Plug It In
-
Get Software
-
Build, Run
1. Plug It In
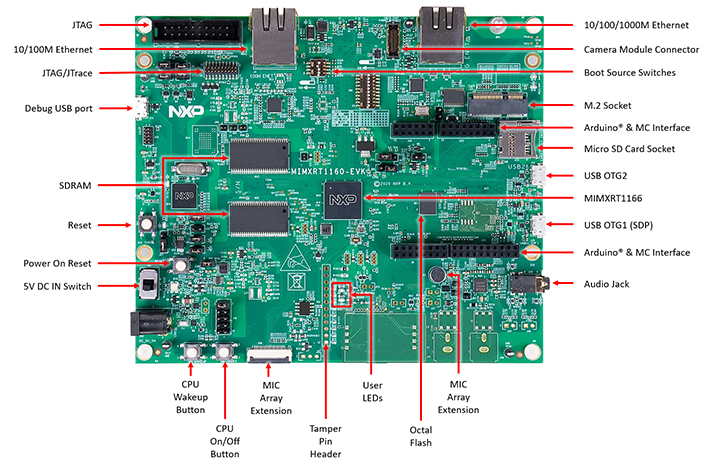
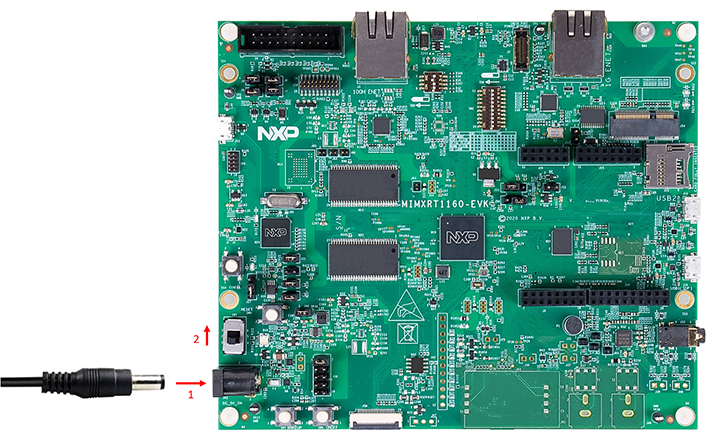
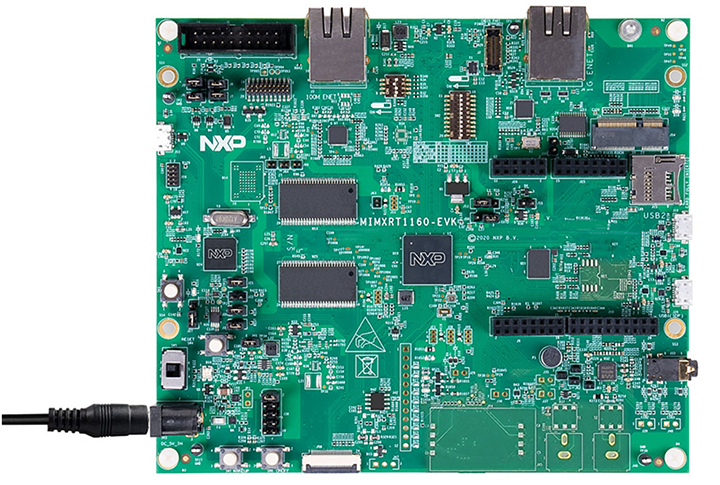
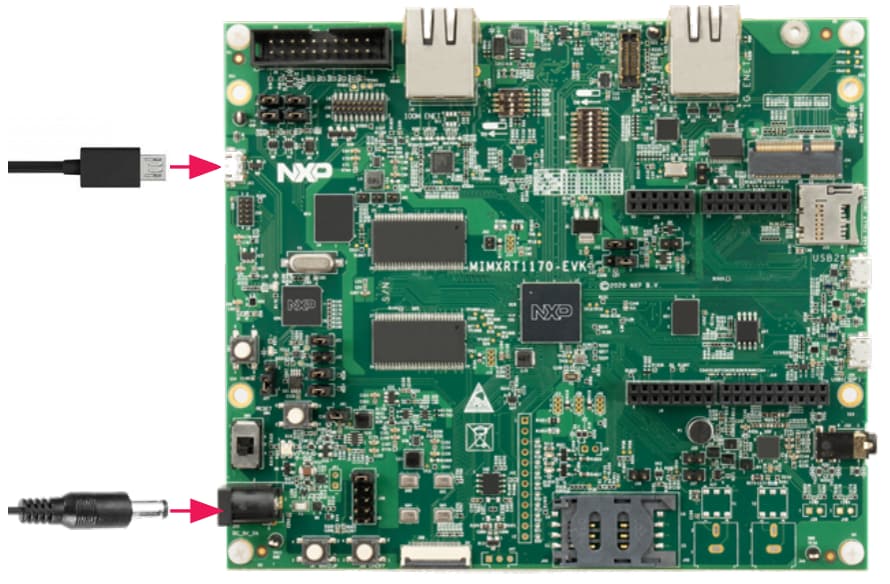
Let's take your MIMXRT1160-EVK for a test drive, you have the choice of watching the sequence in a short video or following the detailed actions listed below.
2. Get Software
2.2 Jump Start Your Design with the MCUXpresso SDK
Want to learn more about SDK? The MCUXpresso software development kit (SDK) is complimentary and includes full source code under a permissive open-source license for all hardware abstraction and peripheral driver software.
Click below to download the latest SDK release for the MIMXRT1160-EVK, make sure you select Host OS, Toolchain and desired components.

2.3 Get Your Toolchain
MCUXpresso IDE is development platform ecosystem from NXP. It provides an end-to-end solution enabling engineers to develop embedded applications from initial evaluation to final production.

Want to use a different toolchain? Need help choosing? No problem, The MCUXpresso SDK includes support for other tools such as IAR , Keil and command-line GCC .

2.4 MCUXpresso Config Tools
The MCUXpresso Config Tool is an integrated suite of configuration tools that guides users in creating new MCUXpresso SDK projects, and also provides pin and clock tools to generate initialization C code for custom board support. It is fully integrated into MCUXpresso or you can download it as a separate tool.

2.5 PC Configuration
Many of the example applications output data over the MCU UART so you'll want to make sure that the driver for the board's virtual COM port is installed. Before you run the driver installer, you MUST have the board plugged into your PC.
2.6 Serial Terminal
Install and configure your preferred terminal software to 115200 baud rate, 8 data bits, no parity and 1 stop bit. To determine the port number of the MIMXRT1160-EVK’s virtual COM port, open the device manager and look under the "Ports" group.
Not sure how to use a terminal application? Try one of these tutorials:
MCUXpresso IDE Terminal Tutorial
The most recent versions of MCUXpresso IDE count with a terminal emulation application. This tool can be used to display information sent from your NXP development platform's virtual serial port.
- Open the MCUXpresso IDE.
- Launch the MCUXpresso IDE terminal by clicking on the “Open a Terminal” button on the top of the IDE or press “Ctrl + Alt + Shift + T.”
- Select Serial Terminal
- Configure the serial port settings (using the LPC-Link2 COM port number) to 115200 baud rate, 8 data bits, no parity and 1 stop bit, then press “OK” button.
-
Verify that the connection is open. If connected, MCUXpresso IDE will look like the figure below at the Terminal view.
-
You're ready to go


Tera Term Tutorial
Tera Term is a very popular open source terminal emulation application. This program can be used to display information sent from your NXP development platform's virtual serial port.
- Download Tera Term from SourceForge. After the download, run the installer and then return to this webpage to continue.
- Launch Tera Term. The first time it launches, it will show you the following dialog. Select the serial option. Assuming your board is plugged in, there should be a COM port automatically populated in the list.
- Configure the serial port settings (using the COM port number identified earlier) to 115200 baud rate, 8 data bits, no parity and 1 stop bit. To do this, go to Setup -> Serial Port and change the settings.
- Verify that the connection is open. If connected, Tera Term will show something like below in its title bar.
- You're ready to go.


PuTTY Tutorial
PuTTY is a popular terminal emulation application. This program can be used to display information sent from your NXP development platform's virtual serial port.
- Download PuTTY using the button below. After the download, run the installer and then return to this webpage to continue.
- Launch PuTTY by either double clicking on the *.exe file you downloaded or from the Start menu, depending on the type of download you selected.
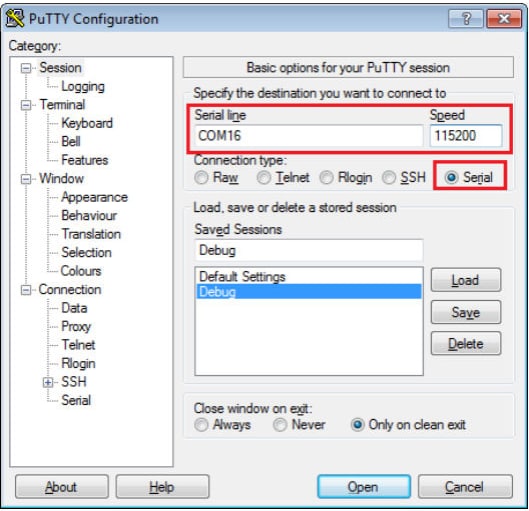
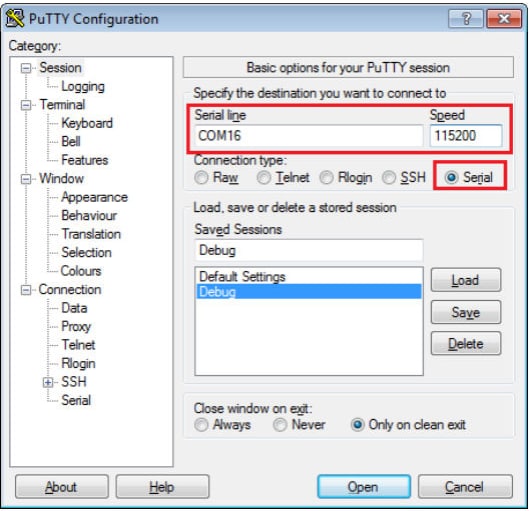
- Configure in the window that launches, select the Serial radio button and enter the COM port number that you determined earlier. Also enter the baud rate, in this case 115200.
- Click Open to open the serial connection. Assuming the board is connected and you entered the correct COM port, the terminal window will open. If the configuration is not correct, PuTTY will alert you.
- You're ready to go


LPCScrypt Tutorial
LPCScrypt is a command-line based, fast flash, EEPROM, OTP and security programming tool for LPC microcontrollers. It is the recommended tool to program the latest CMSIS-DAP and J-Link firmware.
- Download the LPCScrypt tool using the button below, choose your platform
(Windows, MAC OC X, Linux). After the download, run the installer. During the
installation the DFU and VCOM drivers will be automatically installed for all platforms, also for
windows users these drivers can be managed if required by running
lpc_driver_installer.exelocated within theDriverssubdirectory of the LPCScrypt installation. - Launch LPCScrypt by double-clicking on the “Boot LPCScrypt” file in the LPCScrypt
install
C:\ProgramData\Microsoft\Windows\Start Menu\Programs\LPCScrypt.
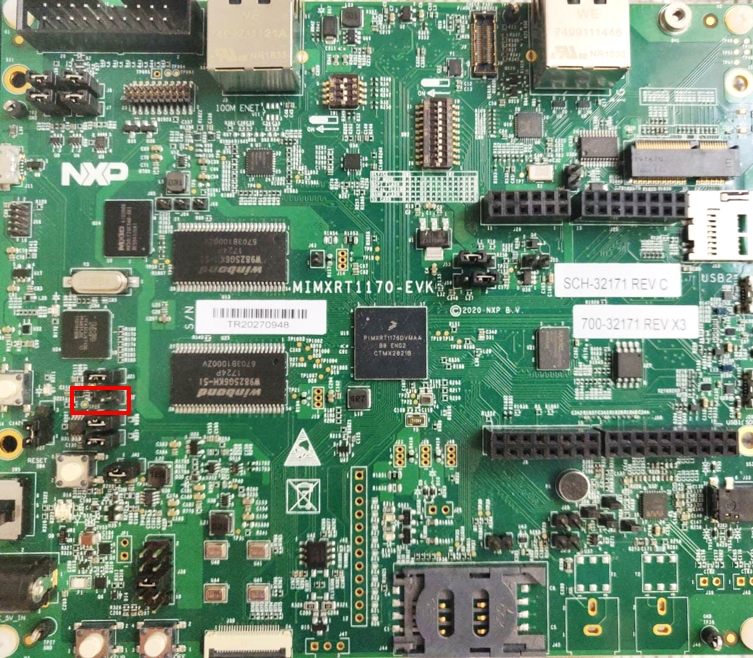
- Configure to program an LPCXpresso v2/v3 board, first ensure that the DFULink jumper is connected.
-
In the MIMXRT1160-EVK,
JP22is the LPCXpresso DFU. Connect jumper onJP22header.
-
In the MIMXRT1160-EVK,
- Plug the power adapter into the MIMXRT1160-EVK board 5V DC IN header (
J43) and switch on 5V DC IN (SW5). - Connect the board to your host computer over the debug link USB connector
J11. - Open a Command shell, and run the
program_JLINKscript to install the JLink debug firmware: - File paths in this document use Windows directory separators, on Linux or Mac OSX these must be replaced with ‘/.’
- For Windows users, shortcuts to these scripts are available from the LPCScrypt entry on the Start menu.
- Verify once you select on firmware, in this case SEGGER J-Link,
LPCScrypt command window will show something like below in its title bar.
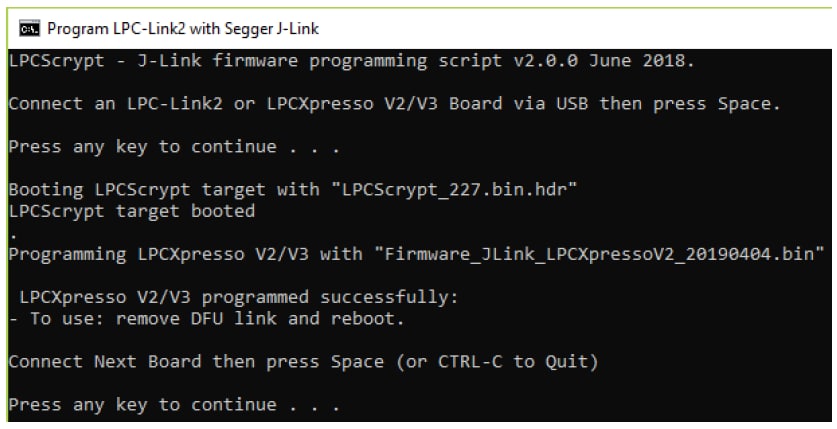
- Ready once programming is complete, disconnect the board from the host. Remove the DFULink jumper, then reconnect the board to the host computer. You should see the probe enumerate on the host’s USB system.

Note:

3. Build, Run
3.2 Explore the MCUXpresso SDK Example Code
The MCUXpresso SDK comes with a long list of example applications code. To see what's available, browse to
the SDK boards folder of your SDK installation and select MIMXRT1160-EVK (<SDK_Install_Directory>/boards/evkmimxrt1160).
To learn more about specific example code, open the readme.txt file in an example's directory.
3.3 Building and Debugging MCUXpresso SDK Examples
If one or more of the demo application or driver examples sounds interesting, you probably want to know how you can build and debug it yourself. The Getting Started with SDK guide provides easy, step-by-step instructions on how to configure, build and debug demos for all toolchains supported by the SDK.
Use the guide below to learn how to open, build and debug an example application in MCUXpresso IDE, IAR Embedded Workbench IDE, Keil MDK or Arm GCC.
Building and running a Multicore demo
Multicore application projects consist of two (or more) linked projects – one project containing the Master code and the other project(s) containing the Slave code. The ‘Master’ project contains a link to the ‘Slave’ project, which will cause the output image from the ‘Slave’ to be included into the ‘Master’ image when the Master project is built. Building the Master project will trigger the Slave project to be built first.
The RT1160 SDK provides a collection of Multicore example applications. Each Multicore example has two source directories, one for the Arm CM7 and one for the Arm CM4.
Build and Flash Multicore Application.
The following steps will guide you through the Multicore Hello World application using MCUXpresso IDE.
- Open the MCUXpresso IDE.
- Switch to the Installed SDKs view within the MCUXpresso IDE window.
- Drag and drop the
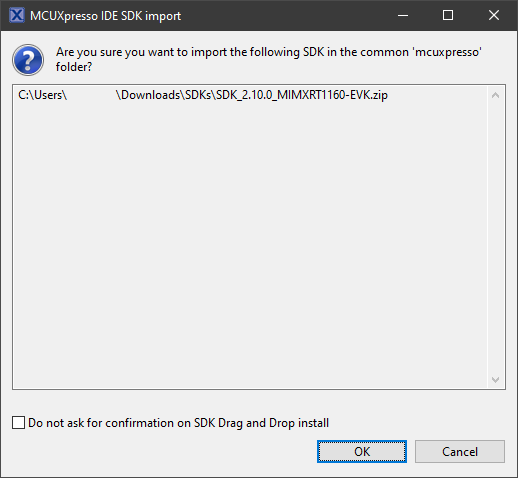
MIMXRT1160-EVK SDK(zipped) file into the Installed SDKs view. - You will get the following pop-up. Click on "OK" to continue the import:
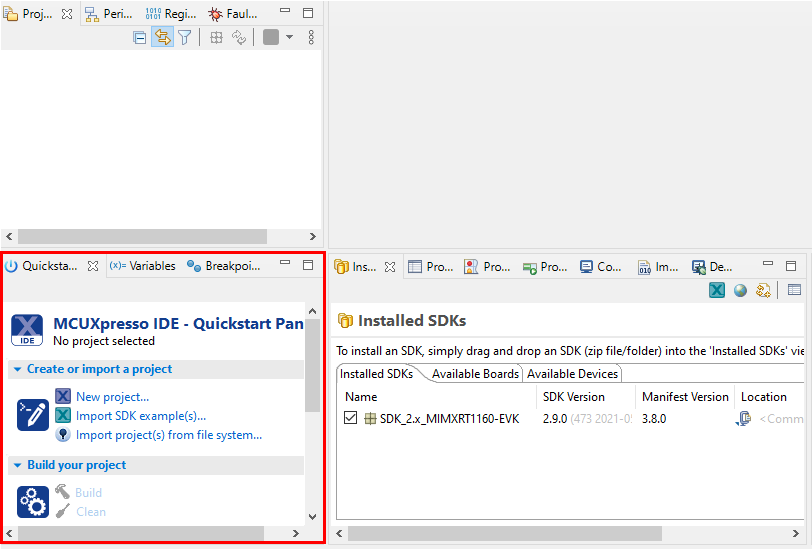
- The installed SDK will appear in the Installed SDKs view as shown below:
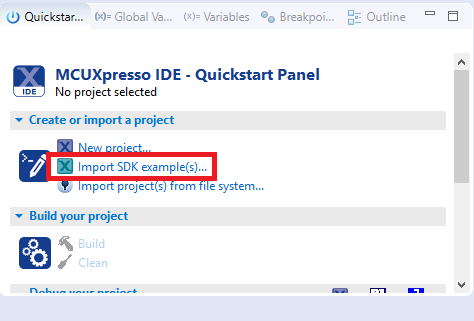
- Find the Quickstart Panel in the lower left-hand corner.
- Then click on Import SDK example(s)…
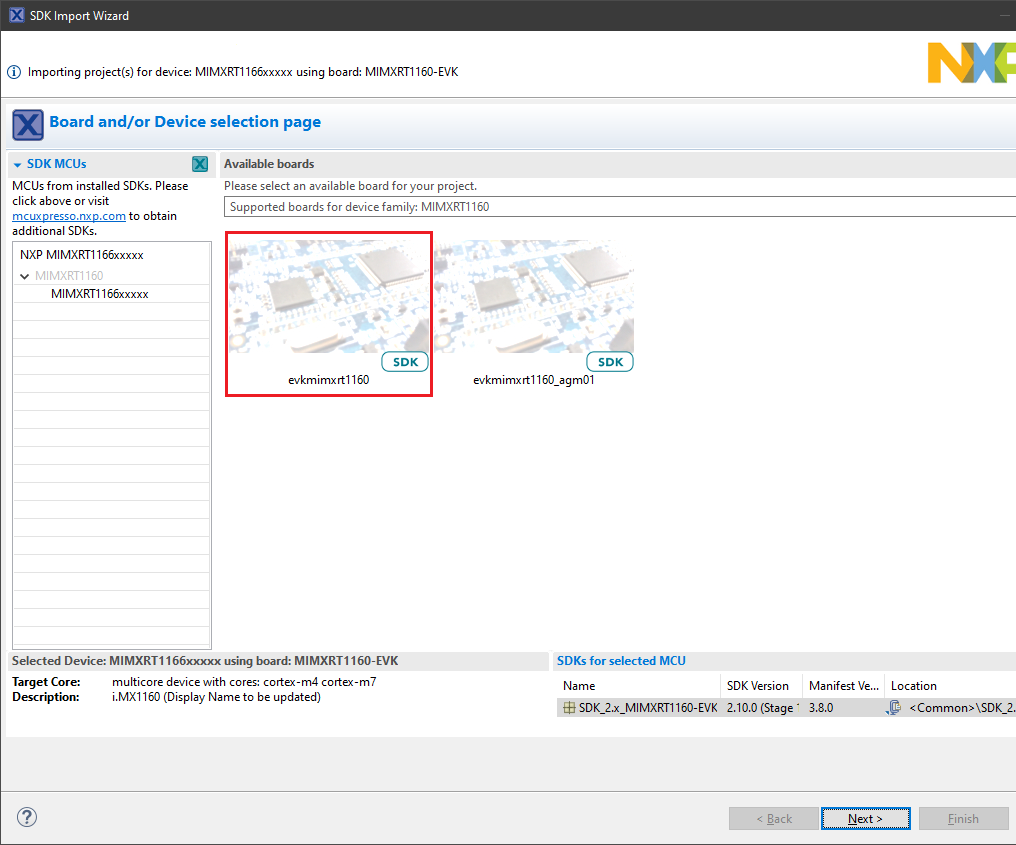
- Click on the evkmimxrt1160 board to select that you want to import an example that can run on that board, and then click on Next.
-
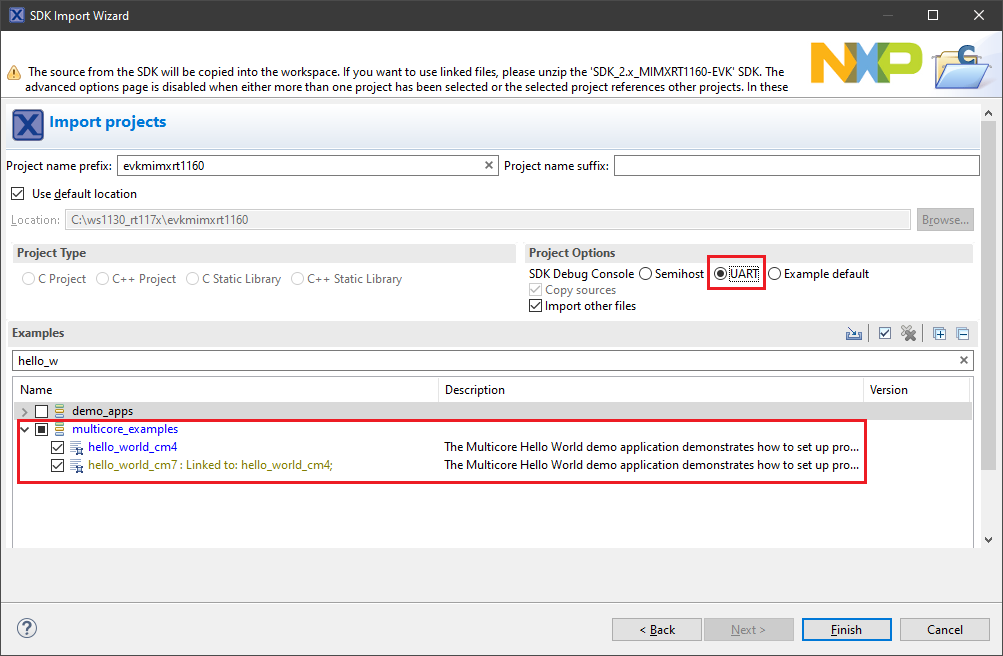
Use the arrow button to expand the multicore_examples category, and then click
the checkbox next to
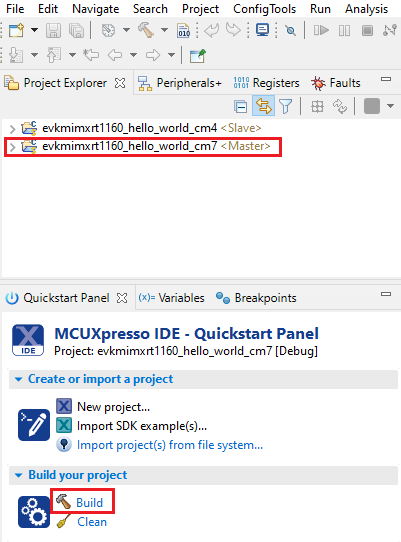
hello_world_cm7to select that project; you will notice that after selecting the cm7 project, the cm4 project will be selected too. To use the UART for printing (instead of the default semihosting), Select UART as the SDK Debug Console checkbox under the project options. Then, click on "Finish". - Verify that hello_world_cm7 and hello_world_cm4 are now included in the Project Explorer.
-
Select the
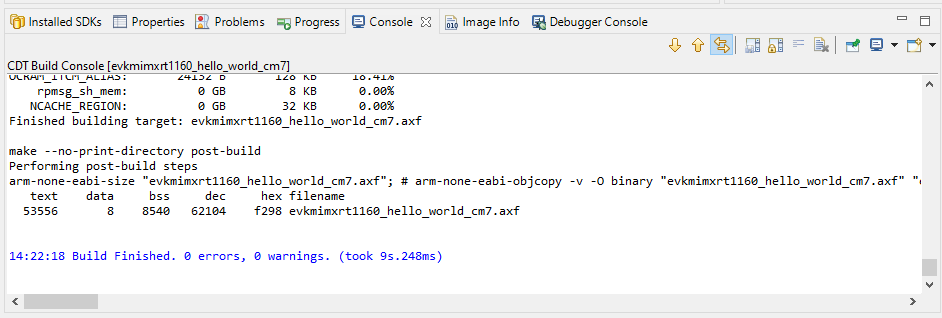
hello_world_cm7project and build it. Notice that MCUXpresso will build the hello_world_cm4 project first, and then it will build hello_world_cm7. - The project will build without problems.


Run an Example Application.
To download and run the application, perform these steps:
- This board supports the CMSIS-DAP/mbed/DAPLink debug probe by default. Visit https://os.mbed.com/handbook/Windows-serial-configuration and follow the instructions to install the Windows® operating system serial driver. If running on Linux OS, this step is not required.
-
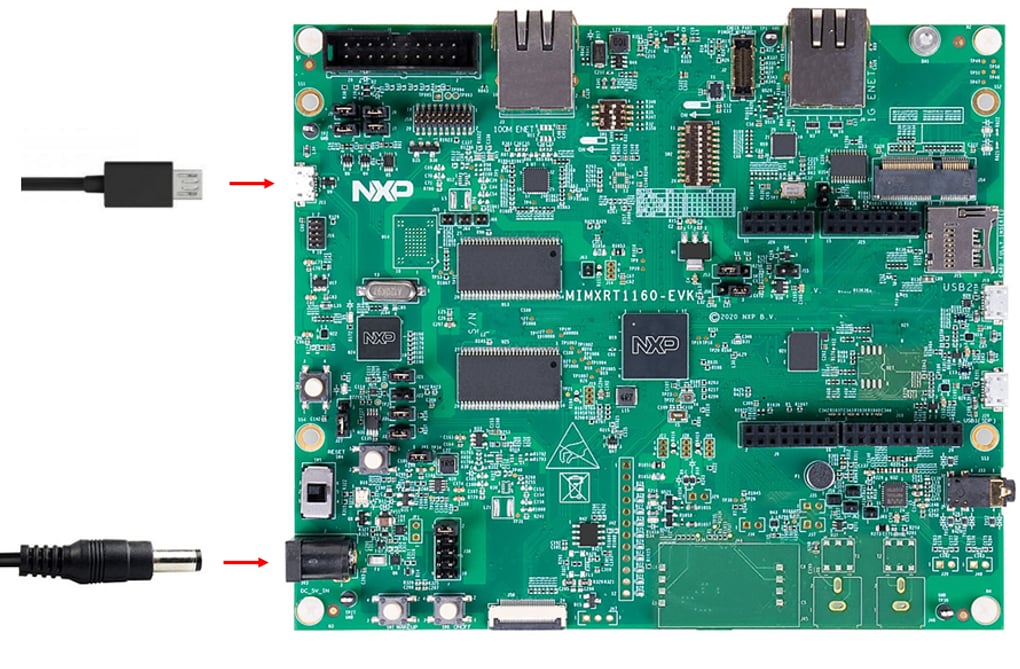
Connect the board to your computer. Consider the following:
- Make sure
SW1is set to 0010 to boot from QSPI - Connect Power supply to
J43(ifJ38is set to [1-2]) - Connect PC with board using micro USB to
J11port
- Make sure
-
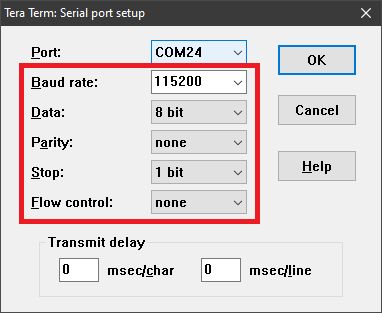
Open the terminal application on the PC, such as PuTTY or TeraTerm, and connect to the debug
serial port number. Configure the terminal with these settings:
- Baudrate: 115200 (BOARD_DEBUG_UART_BAUDRATE)
- No parity
- 8 data bits
- 1 stop bit.
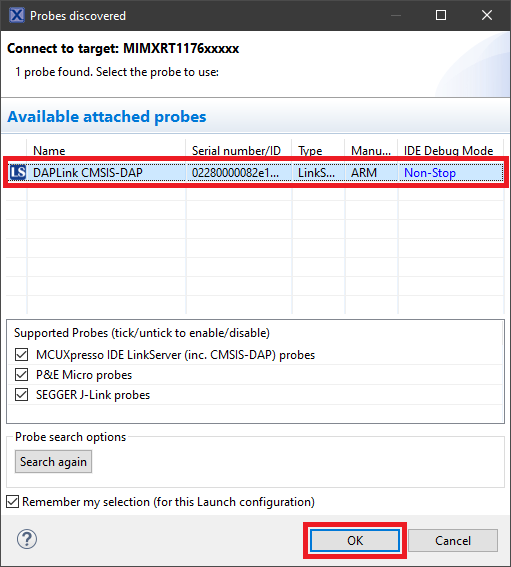
- Select the hello_world_cm7 application and the application to your MIMXRT1160-EVK.
- Select the DAPLink debug probe and click “OK”.
-
A second “Probes discovered” window will appear automatically; this is for the
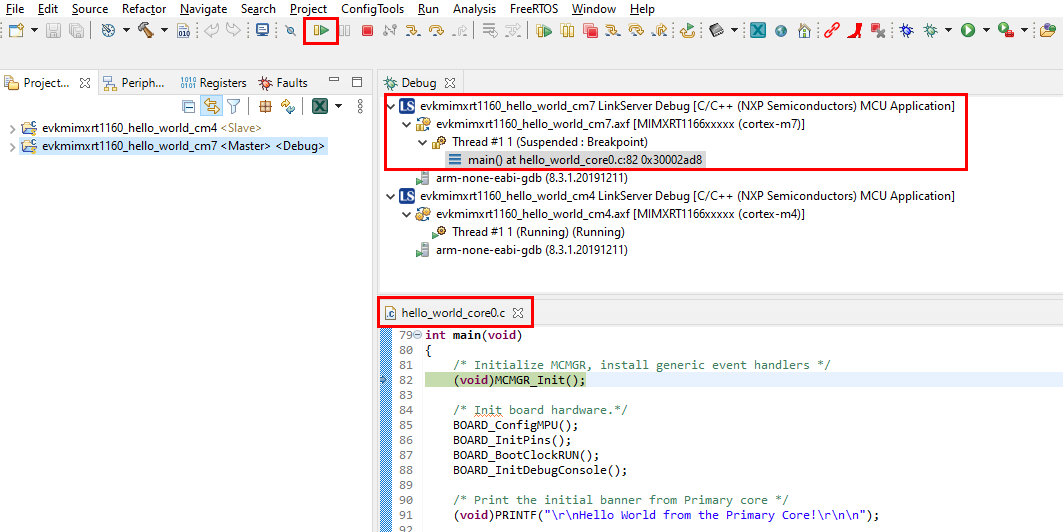
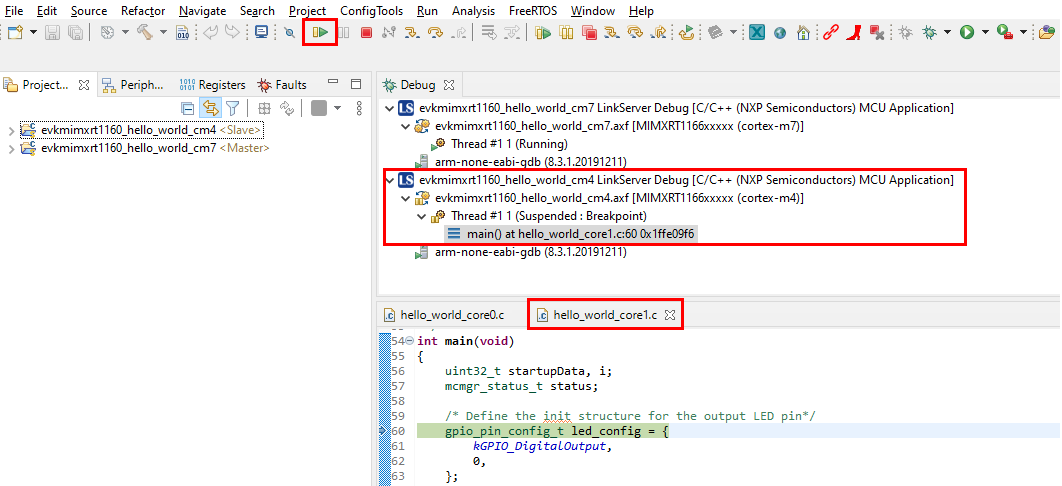
hello_world_cm4project. Again, select the DAPLink debug probe and click “OK”. - Click on "Resume" button to start the hello_world_cm7 project.
- Click on "Resume" button to start the hello_world_cm4 project.
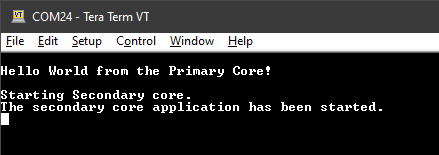
- Now both cores are running. The console should display this output:
- Exit debug session by click multi core stop.


Refer to the Getting Started with MCUXpresso SDK for MIMXRT1160-EVK.pdf in the <SDK install folder>/docs folder from the SDK for additional information and instructions to build and run example applications.
Running a demo using IAR Embedded Workbench IDE
Build an Example Application.
The following steps will guide you through opening the hello_world application. These steps may change slightly for other example applications as some of these applications may have additional layers of folders in their path.
- First unzip the previously downloaded SDK
- If not already done, open the desired example application workspace. Most example application workspace files can be located using the following path:
- Select the desired build target from the drop-down. For this example, select
hello_world – debug - To build the application, click the “Make” button, highlighted in red below
- The build will complete without errors
1<sdk_dir>/boards/<sdk_board_name>/<example_type>/<application_name>/<core_type>/iarUsing the hello_world demo as an example, the path is:
1<sdkl_dir>/boards/evkmimxrt1170/demo_apps/hello_world/cm7/iar/hello_world.eww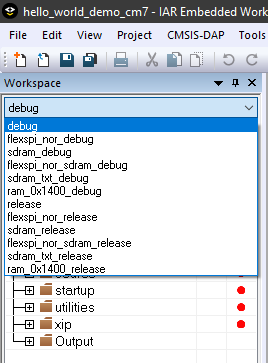


Run an Example Application.
To download and run the application, perform these steps:
- This board supports the CMSIS-DAP/mbed/DAPLink debug probe by default. Visit https://os.mbed.com/handbook/Windows-serial-configuration and follow the instructions to install the Windows® operating system serial driver. If running on Linux OS, this step is not required
-
Connect the board to your computer. Consider the following:
- Make sure
SW1is set to 0010 to boot from QSPI - Connect Power supply to
J43(ifJ38is set to [1-2]) - Connect PC with board using micro USB to
J11port
- Make sure
-
Open the terminal application on the PC, such as PuTTY or TeraTerm, and connect to the debug
serial port number. Configure the terminal with these settings:
- Baudrate: 115200 (BOARD_DEBUG_UART_BAUDRATE)
- No parity
- 8 data bits
- 1 stop bit.
- Click the "Download and Debug" button to download the application to the target
- The application is then downloaded to the target and automatically runs to the main() function.
- Run the code by clicking the "Go" button to start the application
- The
hello_worldapplication is now running, and a banner is displayed on the terminal. If this is not true, check your terminal settings and connections


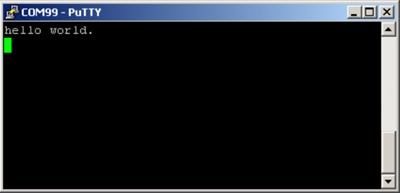
Refer to the "Getting Started with MCUXpresso SDK for MIMXRT1160-EVK.pdf" in the <SDK install folder>/docs folder from the SDK for additional information and instructions to build and run multicore example applications.
Running a demo using Keil® MDK/µVision®
Install CMSIS device pack.
After the MDK tools are installed, Cortex® Microcontroller Software Interface Standard (CMSIS) device packs must be installed to fully support the device from a debug perspective. These packs include things such as memory map information, register definitions and flash programming algorithms. Follow these steps to install the appropriate CMSIS pack.
- Download the MIMXRT1171, MIMXRT1172, MIMXRT1173, MIMXRT1175 and MIMXRT1176 packs
- After downloading the DFP, double click to install it
- After the installation finishes, close the Pack Installer window and return to the µVision IDE
Build the Example Application
The following steps will guide you through opening the hello_world_demo_cm7
application.
- Open the desired example application workspace in:
- To build the demo project, select Rebuild, highlighted in red
- The build completes without errors
1<install_dir>/boards/<board_name>/<example_type>/<application_name>/mdkThe workspace file is named as <demo_name>.uvmpw. For this specific example, the actual path is:
1<install_dir>/boards/evkmimxrt1170/demo_apps/hello_world/cm7/mdk/hello_world_demo_cm7.uvmpw
Run an Example Application
This section describes steps to run a demo application using J-Link GDB Server application. To perform this exercise, make sure that either:
To download and run the application, perform these steps:
- This board supports the CMSIS-DAP/mbed/DAPLink debug probe by default. Visit https://os.mbed.com/handbook/Windows-serial-configuration and follow the instructions to install the Windows® operating system serial driver. If running on Linux OS, this step is not required
-
Connect the board to your computer. Consider the following:
- Make sure
SW1is set to 0010 to boot from QSPI - Connect Power supply to
J43(ifJ38is set to [1-2]) - Connect PC with board using micro USB to
J11port
- Make sure
-
Open the terminal application on the PC, such as PuTTY or TeraTerm, and connect to the debug
serial port number. Configure the terminal with these settings:
- Baudrate: 115200 (BOARD_DEBUG_UART_BAUDRATE)
- No parity
- 8 data bits
- 1 stop bit
- After the application is properly built, click the "Download" button to download the application to the target
- Click on “Start/Stop Debug Session” to open the debug view
- Run the code by clicking the "Run" button to start the application
- The hello_world_demo_cm7 application is now running


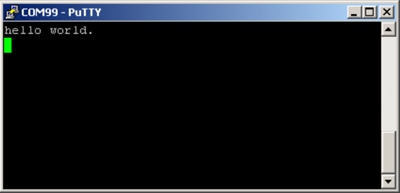
Refer to the "Getting Started with MCUXpresso SDK for MIMXRT1160-EVK.pdf" in the <SDK install folder>/docs folder from the SDK for additional information and instructions to build and run multicore example applications.
Running a demo using Arm Embedded Toolchain
Set Up Toolchain
This section contains the steps to install the necessary components required to build and run an MCUXpresso SDK demo application with the Arm GCC toolchain, as supported by the MCUXpresso SDK. There are many ways to use Arm GCC tools, but this example focuses on a Windows environment. Though not discussed here, GCC tools can also be used with both Linux OS and Mac OSX.
Install GCC Arm Embedded Toolchain
Download and run the installer from launchpad.net/gcc-arm-embedded. This is the actual
toolset (in other words, compiler, linker,
etc.). The GCC toolchain should correspond to the latest supported version, as described in
MCUXpresso SDK Release Notes Supporting MIMXRT1160-EVK from <SDK>/docs folder.
Install MinGW
The Minimalist GNU for Windows (MinGW) development tools provide a set of tools that are not dependent on third party C-Runtime DLLs (such as Cygwin). The build environment used by the MCUXpresso SDK does not utilize the MinGW build tools but does leverage the base install of both MinGW and MSYS. MSYS provides a basic shell with a Unix-like interface and tools.
- Download the latest MinGW mingw-get-setup installer from
sourceforge.net/projects/mingw/files/Installer/ - Run the installer. The recommended installation path is C:\MinGW, however, you may install to any location
- Ensure that the
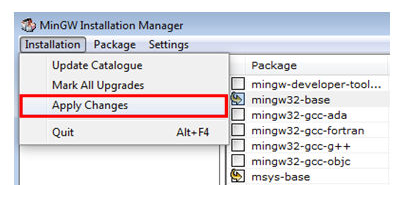
mingw32-baseandmsys-baseare selected under "Basic Setup" - In the Installation menu, click "Apply Changes" and follow the remaining instructions to complete the installation
-
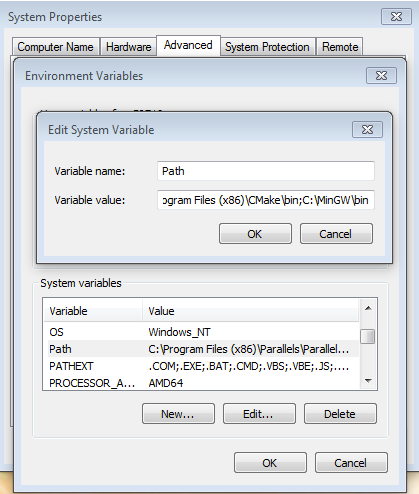
Add the appropriate item to the Windows operating system Path environment variable. It can be
found under Control Panel -> System and Security -> System -> Advanced System Settings in the
"Environment Variables" section. The path is
<mingw_install_dir>\bin
Assuming the default installation path, C:\MinGW,
an example is shown below. If the path is not set correctly, the toolchain does
not work.
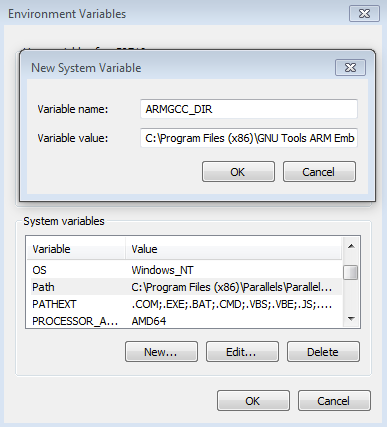
Add a New Environment Variable for ARMGCC_DIR
Create a new system environment variable and name it ARMGCC_DIR. The value of this variable should point to the Arm GCC Embedded tool chain installation path, which, for this example, is:
C:\Program Files (x86)\GNU Tools ARM Embedded\<version>
Reference the installation folder of the GNU Arm GCC Embedded tools for the exact pathname of your installation.
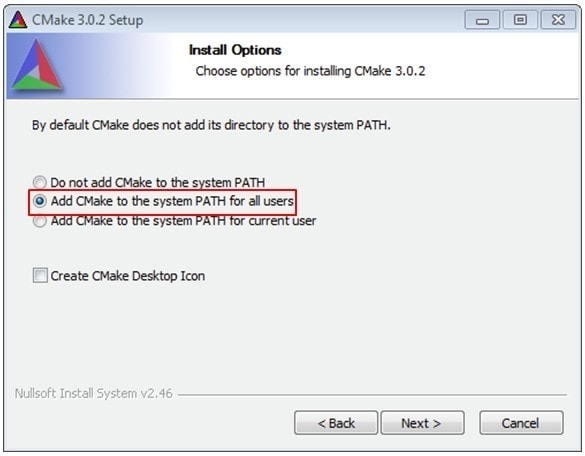
Install CMake
- Download CMake 3.0.x from www.cmake.org/cmake/resources/software.html
- Install CMake, ensuring that the option "Add CMake to system PATH" is selected when installing. It's up to the user to select whether it's installed into the PATH for all users or just the current user. In this example, the assumption is that it's installed for all users
- Follow the remaining instructions of the installer
- You may need to reboot your system for the PATH changes to take effect
- Make sure sh.exe is not in the Environment Variable PATH. This is a limitation of mingw32-make
Build an Example Application.
To build an example application, follow these steps.
- Open a GCC Arm Embedded tool chain command window. To launch the window, from the Windows operating system Start menu, go to “Programs -> GNU Tools Arm Embedded <version>” and select “GCC Command Prompt”
- Change the directory to the example application project directory, which has a path like this:
- Type “build_debug.bat” on the command line or double click on the "build_debug.bat" file in Windows operating system Explorer to perform the build. The output is shown in this figure:

1<install_dir>/boards/<board_name>/<example_type>/<application_name>/armgccFor this guide, the exact path is:
1<install_dir>/boards/evkmimxrt1170/demo_apps/hello_world/cm7/armgcc
Run an Example Application.
This section describes steps to run a demo application using J-Link GDB Server application. To perform this exercise, make sure that either:
- The Freelink/LPC-Link2 interface on your board is programmed with the J-Link firmware. If your board does not support Freelink/LPC-Link2 interface, then a standalone J-Link pod is required
- You have a standalone J-Link pod that is connected to the debug interface of your board
Procedure to configure Freelink/LPC-Link2 interface with J-Link firmware:
- Power off the MIMXRT1160-EVK
- Place a jumper in J22 header to enter DFU boot mode
- Power on the MIMXRT1160-EVK
- Connect to PC through J11 port
- Download and install LPCScrypt from LPCScrypt v2.1.2
- Go to the scripts folder from LPCScrypt location.
ie. C:/NXP/LPCScrypt_2.1.1_15/scripts - Run the “
program_JLINK.cmd” script - After script finishes, close the LPCScrypt window
- Power off the MIMXRT1160-EVK
- Remove jumper from J22 header
- Power on the MIMXRT1160-EVK
- Verify that Device Manager now lists the J-Link interface

After the J-Link interface is configured and connected, follow these steps to download and run the demo applications:
-
Connect the development platform to your PC via USB cable between the LPC-Link2
(
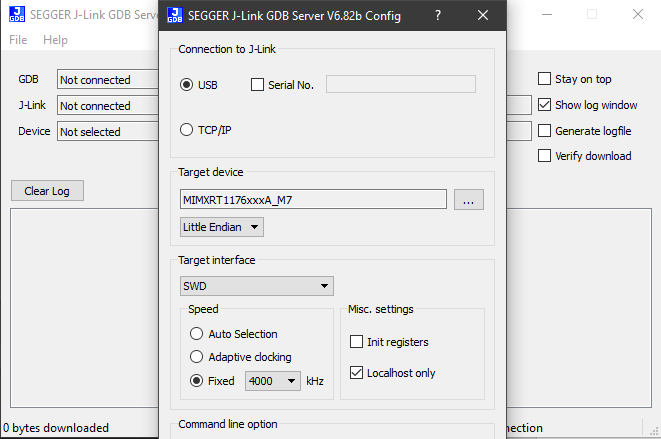
J11) USB connector and the PC USB connector. If using a standalone J-Link debug pod, also connect it to the SWD/JTAG connector of the board - Open the J-Link GDB Server application. Assuming the J-Link software is installed, the application can be launched by going to the Windows operating system Start menu and selecting "Programs -> SEGGER -> J-Link <version> J-Link GDB Server"
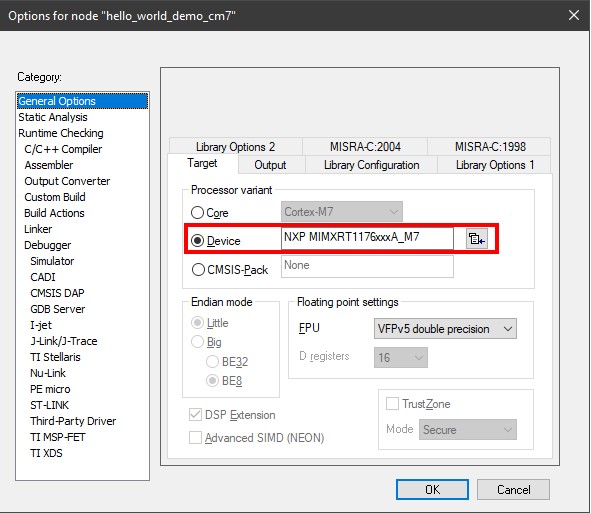
- Select Device “MIMXRT1176xxxA_M7” and Target interface to SWD
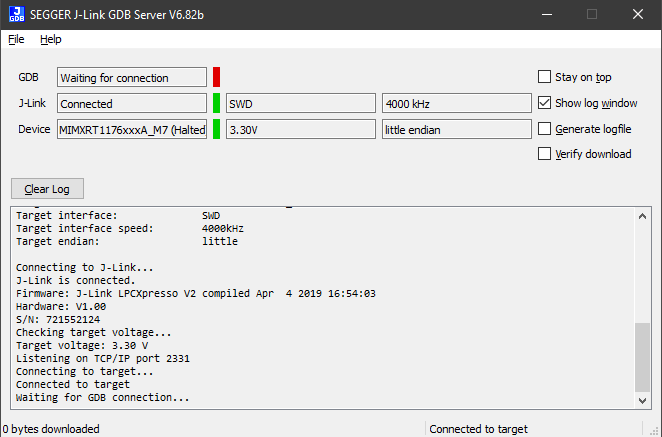
- Verify GDB Server is waiting for GDB connection
- Open the terminal application on the PC, such as PuTTY or TeraTerm, and connect to the debug serial port number. Configure the terminal with these settings:
- 115200 (reference BOARD_DEBUG_UART_BAUDRATE in board.h)
- No parity
- 8 data bits
- 1 stop bit
- If not already running, open a GCC Arm Embedded tool chain command window. To launch the window, from the Windows operating system Start menu, go to "Programs -> GNU Tools Arm Embedded <version>" and select "GCC Command Prompt"
- Change to the directory that contains the demo application output. The output can be found in using one of these paths, depending on the build target selected:
- Run the
arm-none-eabi-gdb.exe<application_name>.elf. For this example, it isarm-none-eabi-gdb.exe hello_world.elf -
Run these commands on the GCC Command Prompt:
- target remote localhost: 2331
- monitor reset
- monitor halt
- load
-
The application is now downloaded and halted at the reset vector.
Execute the monitor go command to start the demo application.

1<install_dir>/boards/<board_name>/<example_type>/<application_name>/cm7/armgcc/debug1<install_dir>/boards/<board_name>/<example_type>/<application_name>/cm7/armgcc/releaseFor this guide, the path is:
1<install_dir>/boards/evkmimxrt1170/demo_apps/hello_world/cm7/armgcc/debugThe hello_world application is now running, and a banner is displayed on the terminal. If this is not true, check your terminal settings and connections.
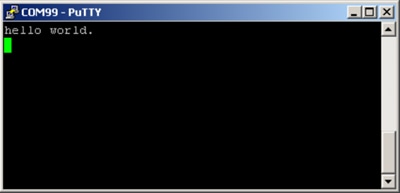
Refer to the "Getting Started with MCUXpresso SDK for MIMXRT1160-EVK.pdf" in the <SDK install folder>/docs folder from the SDK for additional information and instructions to build and run multicore example applications.
Learn
Sensors
Explore the world with a full assortment of NXP sensor solutions. From accelerometers, pressure sensors, touch sensors and many more, NXP has a sensor solution for your project. Find out more at Sensors.
NFC
Near field communication is a simple, intuitive technology that lets you interact securely with the world around you with a simple touch. Learn more about NXP NFC solutions at NFC - Near Field Communication.
RT and MCUXpresso Communities
Connect with other engineers and get expert advice on designing with i.MX processors and MCUXpresso software and tools. Join the community discussion in one of our two dedicated communities: i.MX RT community or MCUXpresso software and tools community .
Wi-Fi®
Getting Started with NXP Wi-Fi modules using i.MX RT platform. Let's take your Wi-Fi module for a test drive. This guide uses the Wi-Fi modules and i.MX RT platforms.
Boot Options
本页内容
- 2.1
Installing Software for MIMXRT1160-EVK
- 2.2
Jump Start Your Design with the MCUXpresso SDK
- 2.3
Get Your Toolchain
- 2.4
MCUXpresso Config Tools
- 2.5
PC Configuration
- 2.6
Serial Terminal


