Getting Started with the i.MX 8M Plus PEVK Evaluation Kit
本文档内容
-
Out of the Box
-
Embedded Linux
1. Out of the Box
The following section describes the steps to boot the i.MX 8M Plus PEVK.
Development kit contains:
- i.MX 8M Plus PEVK board
- Power Supply - USB Type C 45W Power Delivery Supply, 5 V/3 A; 9 V/3 A; 15 V/3 A; 20 V/2.25 A supported
- Cable – Assembly, USB 3.0, Type-C Male to Type-A Male
- Cable – Assembly, USB 2.0, Type-A Male to Micro-B Male
- Adapter – USB 3.0, Type-C Male to Type-A Female
- Software Linux BSP image programmed in eMMC
- Quick Start Guide
Get started developing your application on the i.MX 8M Plus PEVK with the out-of-the-box video. For more information please visit the i.MX 8M Plus applications processor Documentation.
1.1 Get Familiar with the Board

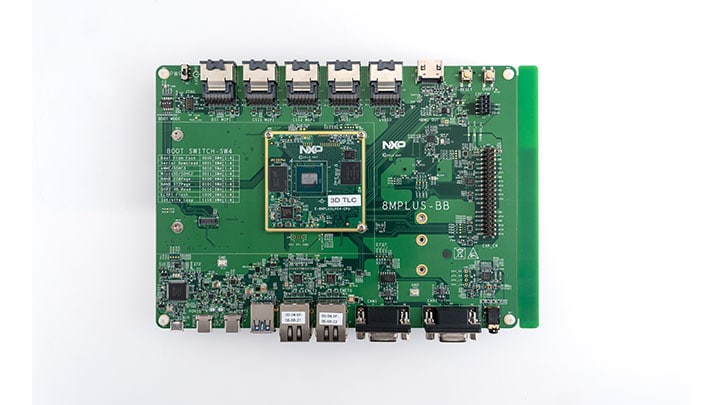
Figure 1. i.MX 8M Plus Power EVK front

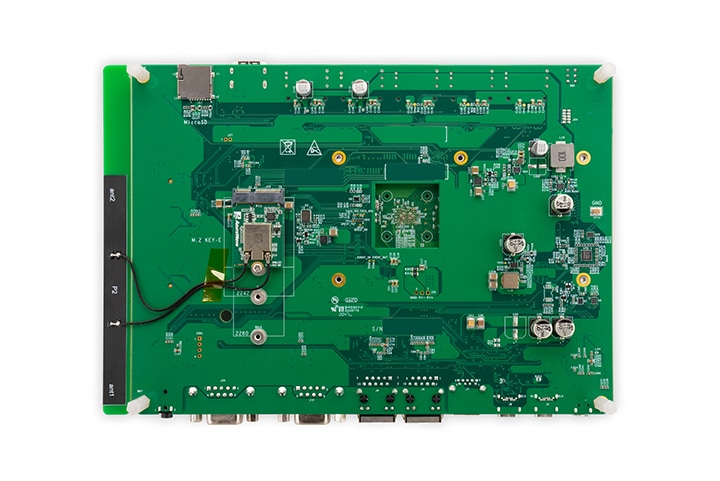
Figure 2. i.MX 8M Plus Power EVK back
The i.MX 8M Plus PEVK is software compatible with the i.MX 8M Plus EVK, but contains additional logic to provide detailed run time power information via a PC-based SW tool.
1.2 Boot from eMMC
Connect the micro-B end of the supplied USB cable into Debug UART port
J23. Connect the other end of the cable to a host computer.
Four UART connections will appear on the PC, the third port for A53 core and the fourth for M7
core system debugging.
If you are not sure about how to use a terminal application, try one of the following tutorials depending on the operating system of the host machine:
Linux

Windows

Windows

1.3 Connect the HDMI cable
To see the user interface provided with the image binary connect a monitor via the HDMI connector (J17).
1.5 Monitor Power at Runtime
Use BCU (Board Control Utilities) or PMT(Power Measurement Tool) to monitor real-time power consumption or export the data to Excel for analysis.
Take BCU as example:
Open terminal or command prompt/PowerShell on the PC, change directory to the location of BCU files and then use below command to monitor voltage/current/power for each rail:
For Linux:
$ sudo ./bcu monitor -hz=1 -board=imx8mpevkpwra1
For Windows:
.\bcu.exe monitor -hz=1 -board=imx8mpevkpwra1
A TUI for power monitor can be seen on the screen.
For more info about BCU and PMT, please refer to PEVK Power measurement User’s guide.
1.6 Connect Power Supply
Connect the power supply cable to the power connector (PORT0).
Power the board by flipping the switch (SW3).
The processor starts executing from the on-chip ROM code. With the default boot switch setup, the code reads the fuses to define the media where it is expected to have a bootable image. After it finds a bootable image, the U-Boot execution should begin automatically.
Information is printed in the serial console for the Corte ®-A53. If you do not stop the U-Boot process, it continues to boot the kernel.
2. Embedded Linux
This section is applicable ONLY if attempting to load a Linux operating system on the board.
The i.MX Linux Board Support Package (BSP) is a collection of binary files, source code and support files that are used to boot an Embedded Linux image on a specific i.MX development platform.
Current releases of Linux binary demo files can be found on the i.MX Linux download page. Additional documentation is available in the i.MX Linux documentation bundle under the Linux sections of the i.MX Software and Development Tool.
2.1 Overview
Before the Linux OS kernel can boot on an i.MX board, the Linux kernel is loaded to a boot device (SD card, eMMC and so on) and the boot switches are set to boot that device.
There are various ways to download the Linux BSP image for different boards and boot devices.
For this getting started guide, only a few methods to transfer the Linux BSP image to an SD card are listed. Experienced Linux developers can explore other options.
Download an NXP Linux BSP pre-built image
The latest pre-built images for the i.MX 8M Plus PEVK are available on the Linux download page under the most current version on Linux.
The pre-built NXP Linux binary demo image provides a typical system and basic set of features for using and evaluating the processor. Without modifying the system, the users can evaluate hardware interfaces, test SoC features and run user space applications.
When more flexibility is desired, an SD card can be loaded with individual components (boot loader, kernel, dtb file and rootfs file) one-by-one or the *wic image is loaded and the individual parts are overwritten with the specific components.
Burn NXP Linux BSP image using Universal Update Utility (UUU)
In addition to the connections from Out of box chapter, connect the PORT1 to the host machine using the proper USB cable.
Turn off the board. Consult Boot switch setup and configure the board to boot on SDP (Serial Download Protocol) mode.
Depending on the OS used in the host machine, the way to transfer the Linux BSP image onto an SD card can vary. Choose an option below for detailed instructions:
2.2 Linux
Install UUU on Linux Distro
Download the latest stable files from UUU GitHub page. An extensive tutorial for UUU can be found in https://github.com/NXPmicro/mfgtools/wiki.
-
uuu libusb1(via apt-get or any other package manager)
Burn the NXP Linux BSP image to the board
The latest pre-built images for the i.MX 8M Plus PEVK are available on the Linux download page under the most current version on Linux.
The pre-built NXP Linux binary demo image provides a typical system and basic set of features for using and evaluating the processor. Without modifying the system, the users can evaluate hardware interfaces, test SoC features and run user space applications.
When more flexibility is desired, an SD card can be loaded with individual components (boot loader, kernel, dtb file and rootfs file) one-by-one or the .sdcard image is loaded and the individual parts are overwritten with the specific components.
By default, this procedure flashes the image to the emmc flash. Check the UUU GitHub page for reference on how to flash the image to other devices.
Open a terminal application and change directory to the location where uuu
and the latest Linux distribution for i.MX 8M Plus PEVK are located. Add execution permission to the
uuu file and execute it. Uuu waits for the USB device to connect
              $ chmod a+x uuu
              sudo ./uuu <release package>.zip
Turn on the board,
uuu starts to copy the images to the board.
When it finishes, turn off the board and consult
to configure the board to boot from emmc.
2.3 Windows
Install UUU on Windows
Download the latest stable files from UUU GitHub page. An extensive tutorial for UUU can be found in https://github.com/NXPmicro/mfgtools/wiki.
-
uuu.exe - Serial USB drivers (depending on your board and Windows installation - check Windows Device Manager)
Burn the NXP Linux BSP image to the board
By default, this procedure flashes the image to the emmc flash. Check the UUU GitHub page for reference on how to flash the image to other devices.
Open the command prompt application and navigate to the directory where the uuu.exe file and the Linux release for the i.MX 8M Plus PEVK are located.
uuu.exe <kernel_version>_images_<SOC>.zip
Turn on the board,
uuu starts to copy the images to the board.
When it finishes, turn off the board and consult
to configure the board to boot from emmc.


